If you want to make your own ukulele, or simply want to know how I make mine, here’s how I go about it. Note that the pictures are in no particular order.
The kit I currently use comes rough sanded from the factory, so day one is devoted to sanding. I use four different grits, apply a sanding sealant, then I sand again, using the last two finest grits. I always wear a dust mask, and constantly vacuum up the dust. It’s important not to sand too much wood away, especially on the side of the neck, so that the finger board lines up correctly. It’s also wise to use a sanding block on the top and bottom of the ukulele body, to keep its surface level.
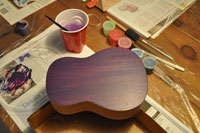
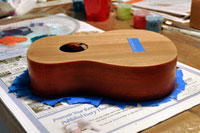 Measuring comes next, and I agonize over it. Marking centerlines and bridge placement correctly makes a huge difference. After that, I part ways with the instructions and start painting. I like to paint the individual parts separately. There is a fair amount of masking to be done at this point. The bridge and the area where the neck meets the body are masked so the design works with the placement. I paint the back, sides, and neck, using layers of glaze to achieve a lovely depth to the colors. The glazing medium is sticky and dries slowly, so I watch for dust and hairs.
 Next comes the design. Designing takes the most time of the whole project. First I trace the outline of the body and the head, marking the peg holes with a pencil. I carefully cut out the shape. To find the sound hole, I tape the template to the uke body, and then make tiny pinholes around the sound hole, feeling carefully for its edge. Now I connect the dots to draw the hole. I print the template several times, and begin to draw. I produce lots of eraser dust at this time. When I’m finished, I cut out the template and check it against the uke. Then I fold it in half, and use the crease to confirm the centerline.
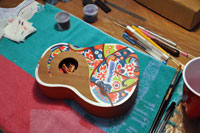 Now it’s time to mask off the sides and focus on the ukulele’s top. I may apply a white base coat first, but if I want the beauty of the wood grain to show, I leave it naked. Then I transfer the design using transfer paper. The areas to be painted must have a couple of coats of white paint applied first, in order for the colors to remain bright. At this point, the radio goes on, and I paint the design.
After the painting is completed, I assemble the ukulele, paying special attention to the placement of the finger board. Measurements between the nut and the body must be exact. After the finger board is glued and clamped (an interesting process), I mask it off very carefully.
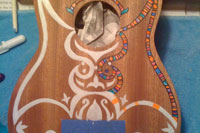 The placement of the bridge and nut are still masked off, and these masks are removed. It’s time for more agonizing. Not only is the distance from the nut to the bridge important, but also its positioning side to side. To help with the measuring, I assemble the tuning pegs onto the head, run embroidery thread around them, attach the ends to the bridge, and move the bridge side to side until I’m positive the strings are equidistant from the edges of the finger board. The nut position is involved too, so when I’m satisfied that its position is correct as well, I hinge-tape it to the finger board.
 Before attaching the bridge, I make some adjustments to it so that the strings seat properly. The strings that come with the kit are useless, so I use professional strings that have different gauges. These are thicker, so the slots in the bridge need to be carved out and sanded smooth. I make sure the saddle is smooth too. Only then can the bridge be attached to the uke’s body.
I use inks that are water-soluble, so the next step is to fix them with spray lacquer. I don a respirator for this task and make sure all surfaces are dust-free. Two coats later I apply a coat of polyurethane. I do this because I don’t like the texture that the spray lacquer leaves behind.
Now I string the ukulele, and check again for horizontal positioning, and also the height distance from the strings to the frets. If the strings are too high, they are removed and the nut, still hinge-taped, must be lifted so that wood underneath can be carefully sanded down, which results in the nut sitting lower in relation to the finger board.
Next I restring the ukulele, and check the measurements for the last time. The strings are removed again, the nut is glued, and the instrument is strung for the last time. Now it can be tuned and played for the first time.
Now that you have all my trade secrets, I hope that more ukes will come into the world as creative individual works of art.